MIDI Voyager Pro — Full Reference
Every setting, explained
The detailed reference behind the basics guide — for once you've got a playlist going and want to fine-tune loops, mixing, chord display or MIDI I/O. Features marked Pro require the paid version; everything else works in the free app.
Files & folders
Supported MIDI file types
Type 0 (single track), type 1 (multi-track) and type 2 files are all supported, along with several Roland GS and Yamaha XG NRPN events. A file authored for the XG standard needs an "XG System on" SysEx message to trigger XG-specific handling — for example, falling back to bank 128 for drum kits missing from bank 127.
Files can live anywhere on the device's storage (internal memory or SD card): copy whole folders over from a computer (ideally into a root-level folder like "Midis" or "Music"), or download a file straight from a website. After copying over USB, unplug the cable before expecting the files to show up in the app's file browser — Android can take a moment to notice them.
Per-file settings
Every change made to a loaded file (pitch, tempo, instruments, volumes...) is saved
automatically and reapplied the next time it loads. The MIDI file itself is never touched — a
small companion file is created next to it instead (same name, .mfs extension),
stored in the "Midi_Voyager" folder at the root of the device.
To carry your settings over to another install (with the same MIDI files), just copy the
.mfs files into the "Midi_Voyager" folder on the other device. They're
app-specific — don't try to open them any other way.
Default directories
Default folders for exported audio and MIDI files are configurable from the settings screen. By default they follow the source file's own folder rather than a fixed path.
Tip: long-press the yellow folder icon on the file-open screen to swap the "Default Midi" directory for the one containing the file currently loaded.
SoundFonts
The app renders MIDI playback through SoundFont banks (.sf2). General MIDI (GM) banks are recommended. The bundled default, "8Rock11", is a tiny 3 MB compressed bank with fairly limited quality — load your own for noticeably better results (the Titanic bank elsewhere on this Workshop page, or "Chorium (Revision A)", another well-known free option).
The default bank always stays in the internal storage's "Soundfonts" folder and can't be moved; you can add other .sf2 files there, or load one from any other folder (an external SD card, if your device supports it). The "SF2..." button on the settings screen lets you browse and pick a SoundFont.
The app can also load SoundFonts compressed with WavPack, FLAC and Opus. Any bank you add needs
a .sf2 or .sf2pack extension, or it won't be recognized.
Default drum kit
If a SoundFont contains several drum presets (bank 128), pick which one to use per MIDI file via the pencil button > "Select default drum kit". That saves you from redoing it for every file from the instrument mixing screen (the [P] button) — though you can still pick a different one for a specific file whenever needed.
Typical multi-bank scenarios
- An extra drum SoundFont: put it first in the list, followed by the SoundFont holding the melodic presets. No bank filter is needed.
- Only one or two instruments from a SoundFont, the rest from another: the "source" SoundFont for those instruments needs to be first in the list; set both sources' bank filter to "All banks", then pick the instruments you want in the preset filter screen for the first source.
- Several single-instrument SoundFonts on top of a multi-instrument one: put the single-instrument banks first, followed by the SoundFont covering everything else. Reassign the MIDI program number if needed (e.g. a guitar SoundFont mistakenly set to program 0 should be reassigned to a guitar-type program like 24).
Tip: in the instrument mixing screen, the "P" (presets) button shows the combined list of presets actually in use, reflecting SoundFont order, disabled presets and any program reassignments.
Playback
Audio buffer
Normally there's no reason to touch the audio buffer settings (on the playback settings screen). Two situations are worth revisiting it for:
- Choppy playback: try raising the buffer size and/or update period. Outside of live playing via simultaneous MIDI In, increasing the buffer (say, to 70 ms) doesn't do much.
- MIDI In (live playing): set the buffer as low as it'll go (≤20 ms), unless you're also playing back a MIDI file at the same time.
Android 5.0's system-level improvements allow buffers under 20 ms on supported devices (a Google Nexus 9, for instance, can go as low as 14 ms).
Playback modes
Four playback modes exist; three are configurable from the settings screen's "Playback" category:
- Rewind the current file and stop
- Replay / loop the current file
- Play the next file in the current folder, playlist, or queue
Playing in the background
To keep playback going without the app staying on screen, exit it first with the back button, then pick "Exit — Keep playing". Just returning to the home screen without exiting risks Android killing the app sooner or later to free up memory. Once "Exit — Keep playing" is active, a notification icon shows up (from Android 4.0 onward, with pause/next/exit controls in the pulled-down notification bar).
Recursive folder playback
A long-press on a folder (instead of a short tap on a file) plays every file in that folder first, then its subfolders. It's technically possible to play everything from the SD card's root, but scanning can take a while — better to pick one folder at a time.
Queueing files
A long-press on a file in the browser opens "Enqueue file": the file is added to the end of a "temporary playlist" instead of being played immediately. Once the current song finishes (or you tap "Forward"), the next queued track is pulled off and played. A long-press on "Forward" shows the remaining queue — picking a file further down the list drops everything before it.
Play controls, button by button
Play
- Short tap: play / stop the current file
- Long-press: opens an advanced MIDI file picker
Rewind
- Short tap: jumps to the previous file if already at the start, otherwise rewinds (and keeps playing)
- Long-press: opens the current folder's file picker
Forward
- Short tap: jumps to the next file in the current folder
- Long-press: opens the current folder's file picker
Loop
- Short tap: opens the looping panel, for short-range loops (e.g. half a bar) or to turn on "loop the whole" file
- Long-press: directly toggles looping the entire file (same effect as the "Replay/loop current file" playback mode)
The loop icon turns green while active.
Open file
- Short tap: shows the "Open MIDI file" screen
- Long-press: opens the current folder's file picker
Hidden on small screens (use the menu instead). A long-press on Play/Stop also works as an "eject" command.
Tempo / BPM and Transpose / Pitch
- Short tap: shows the BPM and Pitch/Transpose sliders
- Long-press: resets tempo and transpose back to their original values
Volume & mixing
A note's final volume stacks several layers:
- the channel volume (the MIDI file's own volume-controller events, editable from the mixing screen);
- the track volume, available only for multi-track files (also from the mixing screen);
- the SoundFont bank's own volume level (settings screen);
- the per-sample volume baked into the SoundFont (only editable in a SoundFont editor);
- the velocity stored on each MIDI note itself (only editable in a MIDI editor — related to volume, but not always identical to it).
Track volume modes
Dynamic vs. static control
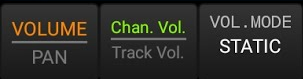
Every file can use either "static" or "dynamic" volumes (mixing screen). Dynamic mode preserves the file's own relative volume changes (fade-ins/outs), capped at 100% of their original value — so you can't make a part louder than the source without lowering the others. Static mode replaces all MIDI volume commands with the slider position on the mixing screen (absolute 0-127 values) and usually plays louder overall.
Tip: static mode is the way to bring back a track that's normally silent — karaoke files sometimes have the vocal melody muted at source (often channel 4, volume 0): manually raise its slider in "Channel Vol." mode to hear it.
Track volume
An extra control layer, specific to multi-track (type 1) files, independent of the MIDI data itself (handled by the internal mixer, not MIDI commands). It lets you adjust instruments that share the same channel independently — something channel-only control can't do. Final volume combines both the channel level and the track level.
Default volume modes
- If a file has several tracks sharing the same MIDI channel, "Track Vol." mode is picked automatically (the only way to adjust them separately).
- For any other file not yet touched, the default is "Channel" + "Static" — what most people expect out of the box.
The instrument mixing screen
Reachable from the main screen (on larger screens), this lets you control volume, pan and program for each track/channel, plus solo and mute. For a single-track type 1 file with mixed channels, the mixer offers per-channel control; otherwise it shows the actual tracks. For multi-track files, an extra "Chan Vol. / Tracks Vol." button appears at the bottom.
Channels vs. tracks
- Type 0 files hold a single track that can carry all 16 channels; the app creates one virtual track per channel actually used (16 max).
- Type 1 files can hold well over 16 tracks (up to 1024 in the app). Usually each track carries a single MIDI channel; when it carries several, it's shown on an orange background.
Program changes normally apply per channel, not per track. Picking an instrument for a track that shares its channel with others will apply to every note on that channel — with a possible side effect on other tracks sharing it.
Playlists, in depth
Reachable via the "Playlists" button on the "Open files" screen (or straight from the menu on larger screens).

Two ways to build a playlist:
- start a new, empty playlist;
- pick a folder full of .mid/.kar files — the playlist then takes that folder's name.
For one-off use, queueing a file (see Playback above) is usually simpler than building a full playlist.
Editing a playlist
Select a playlist, then tap the pencil button at the bottom of the screen (or long-press the playlist directly) to:
- rename it;
- add titles (pick them from the file browser);
- reorder or remove titles;
- copy every title over to another playlist.
Playlists live in the app's "Playlists" subfolder and can be copied between devices — as long as the files they reference exist in the same place on both.
Adding the current file to a playlist
Use the menu and pick "+/- title": the file being played is added to the selected playlist (or removed, if it's already in there).
The "Playback mode" setting has no effect while a playlist is playing — the next file always follows automatically. A loaded playlist resumes the next time the app launches; loading a single file from "Open midi file" while a playlist is active turns playlist mode off (the active collection then becomes the current file's folder).
Grid, quantization & sync
Grid / quantization cursor
For precise loop/marker start and end points (landing exactly on a note event), turn on grid-snapped placement. The default is 1/8: tapping the screen to position the cursor then only allows multiples of 1/8. The grid/quantization value itself is set with a long-press on the screen (outside a loop zone).
Delay cursor
A value in milliseconds to compensate for any offset between the displayed position and what you're actually hearing. Most devices land somewhere between 30 and 60 ms, some needing a negative value. Tip: start wide (-150 or +150 ms) to figure out which sign you need, then dial it in.
Karaoke display & chords
Character encoding & fonts
Karaoke text rendering hinges on two settings: charset/encoding, which decides how the raw bytes tagged "lyrics" or "text" in the MIDI file get interpreted (in most cases, "auto-detect" or "default" is all you need); and a custom font, in TrueType (.ttf) format, if the system font isn't to your taste.
A custom font only applies to "classic" karaoke mode, not to text shown inside the bars view.
Tip: "Comic Sans" remains a safe, easy-to-read pick for lyrics — on Windows, copy it over from
C:\Windows\Fonts.
Note color scheme
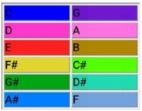
The colors aren't random: the spectrum follows the circle of fifths (C - G - D - A - E...), which helps you spot notes, chords and key areas at a glance.
Chords in karaoke mode
In "lyrics in bars" karaoke mode, the file's chords are analyzed and shown above the lyrics. The result isn't always perfect (extra chords, gaps where nothing was detected, an imprecise name), but you can fix it: delete, add or rename chords from the "Edit song chords" window (the "C7" chord button on the toolbar, visible in "lyrics in bars" mode, then "edit chords").
The first edit takes a snapshot of the analysis result, which then becomes the reference used on every later load (even if the file changes) — unless you pick "Restore original chords". Tip: to quickly clear out unwanted chords, turn on multi-select mode and use the trash button.
Chord analysis
Instant analysis: positioning the playback cursor analyzes and highlights the relevant notes (on the piano view, if shown), with the result displayed bottom-left. Turn it on from the settings screen, "Chord Analysis" category.
Full-song analysis: "Extras" menu > "Analyze chords", a two-step process.
Step 1 — extraction: easy for chords stacked vertically, trickier for arpeggiated chords (where a chord starts or ends isn't always obvious). Two methods are offered: method 1 suits structured, rhythmic music better (pop/rock, vertical notes) — used automatically in "lyrics in bars" karaoke mode; method 2 suits arpeggiated chords better (classical music, for instance).
- Notes on channel 10 (drums/percussion) are ignored.
- Notes on muted channels aren't used, except in "lyrics in bars" mode.
- In "lyrics in bars" mode, the app automatically favors the relevant tracks (it skips ones named "voice"/"vox", or typically melodic instruments like flute or oboe, for instance); you can also manually pick which tracks to analyze via the "C7/Am" button.
Step 2 — chord/key area analysis: takes the current key signature into account (for enharmonic spelling, e.g. Gb vs F#) and the "Note Naming Culture" setting on the piano settings screen.
Chord type library
Over 40 chord types ship by default; you can add, edit or remove them from Settings > Chord Analysis > Manage chord types (the "+", pencil and trash buttons at the bottom of the screen).
Chord intervals are defined by scale degree, not semitone count (the number in a symbol like "C7" doesn't mean 7 semitones — it means a "minor seventh", i.e. 10 semitones: the degrees of "Cm7" are 0, 3, 7, 10). An interval can be flattened (♭) or sharpened (♯), and marked optional in brackets (e.g. [5], since the fifth is often left out of a chord).
Time & key signatures
Shown if enabled in the visualization settings. Plenty of MIDI files don't declare a time signature at all: it then defaults to "4/4" and is shown in red instead of turquoise, flagging that it isn't actually present in the file. Likewise, a missing or wrong key signature can be fixed manually via the "Extras" menu — useful in particular for chord analysis, whose note naming can depend on it.
Loops & markers
Short-range looping
This is about looping a narrow range (e.g. half a bar) — not looping the entire file, for which turning on "Replay/loop current file" mode is enough (long-press the loop button, or the checkbox in the looping window).
- Create a loop: the "+" button on the loops toolbar, or long-press the screen.
- Edit a loop: long-press a loop button or a blue loop zone — a menu appears (among other things, exporting the loop as a MIDI file).
- Nudge a loop during playback: double-tap a blue zone to enter shift mode, then drag left/right (snaps to the quantization grid); a single tap returns to normal mode.
- Trigger quantization ("Loop end" or 1/4, 1/2...): controls when a triggered loop actually starts — with "Loop end", for example, loop B waits for the currently playing loop A to finish before starting.
For more elaborate loop chains, see "Jump" markers below.
Markers
A marker (red arrow) lets you jump playback to a precise position by tapping it. Create one with the "+" button on the markers toolbar, or by long-pressing the screen; edit one by long-pressing its button.
Jump markers
Unlike regular markers (which need a manual trigger), Jump markers automatically redirect playback to another position as the song plays. Create a regular marker first, then convert it (long-press > "Convert to...") by assigning it a target marker.
Jump marker playback mode needs to be switched on (the white triangle / turquoise arrow button on the markers toolbar) for jumps to actually happen — toggle it before or during playback.
Example of a more elaborate loop: marker1 ... marker2 ... jumper1 (to marker3) ... marker3 ... jumper2 (to marker2) ... — playback jumps to marker 3 upon reaching jumper1, plays through to jumper2, then loops back to marker 2.
Another use: rehearsing only certain passages of a song (say, two verses) by skipping the material in between, using Jump markers placed at the right spots.
Program change markers
These trigger a program change (bank/instrument + MIDI channel 1-16) at a specific position. Create a regular marker first, then long-press > "Schedule program change..." to pick:
- the track involved (which determines the target MIDI channel);
- the instrument/preset to apply, from whichever SoundFont(s) are loaded (a bank change is sent automatically just before, if needed).
If you switch SoundFonts afterward, an existing program change may stop having any effect.
Pro-only features
Everything above works fully in the free version. The features below need the paid Pro unlock — grouped here so you can judge at a glance what it actually adds before buying it (see the main guide for why we don't link to a Pro download).
Loading several SoundFont banks at once
- Load as many SoundFonts as you like at the same time (limited by available RAM).
- Choose which bank(s) each SoundFont contributes: all banks, melodic presets only, or drum presets only (banks 127 and 128 are assumed to hold drum presets).
- Restrict a SoundFont to specific presets.
- Reassign the program number of any melodic preset.
- Pick a SoundFont's default drum preset per MIDI file (a drum preset's program number itself can't be reassigned).
Priority between SoundFonts: if the same preset exists in several loaded banks, the one from the SoundFont highest in the list wins. For instance, if the first bank has a single "grand piano" sound (slot 0), that sound is always used for any program change to program 0, whatever other banks are loaded below it.
Creating and editing perspectives
Main menu > "Extras" > "Create note perspective" (portrait mode only).
- Edit an existing perspective: select it (the "eye" button cycles through perspectives), then adjust the X/Y/Z sliders.
- Create a perspective: pencil button > "create a copy" of the current one.
- Delete a perspective: pencil button > "delete" (the first perspective can't be deleted, only edited).
Some rotation values, particularly negative ones, can produce display glitches.
Exporting a modified MIDI file
A loaded file can be saved as a new MIDI file with your volume, pitch, tempo, channel and signature changes baked in. For multi-track files, a track's channel can be reassigned too.
- Muted tracks are dropped from the export.
- The active volume mode (static or dynamic) is respected as long as the channel volume hasn't been changed on a multi-track file.
- If pitch has been changed, existing key signatures are transposed accordingly (Settings > Midi Export setting).
- If instruments were changed, track names are updated with the standard General MIDI instrument name (same setting).
MIDI in/out over USB
Communication with external gear can be flaky: in rare cases the app may freeze and need a device restart. Save any work in other apps before using this feature.
MIDI In
A USB-connected MIDI controller/keyboard is useful in two ways:
- Playing live with the loaded SoundFont's sounds, either during file playback or at a standstill (for live playing without simultaneous playback, set the audio buffer as low as possible). Set "CC target" to "Live stream" in the mixing screen to also route continuous-control changes and pitch bend to the instrument's channel. Which instrument gets used depends on the mixer screen's "Live instrument" setting: Auto (the incoming MIDI event's own channel — use this if the file already has instruments on that channel), Track (the selected track's instrument), or a custom preset from the SoundFont. This choice is saved per MIDI file.
- Remote-controlling channel/track parameters: set "Target" to "File" on the tracks screen to apply continuous-control changes (volume, etc.) to the MIDI file's own channels. To control every track/channel, pick "Auto" as the "Live instrument" — otherwise every event goes to a single fixed channel.
Either way, on top of note on/off, these events are recognized and applied to the chosen stream: pitch bend/wheel (0 to 16383, 8192 = center), CC1 (modulation), CC5 (portamento time), CC7 (volume), CC10 (pan), CC11 (expression), CC64 (sustain), CC65 (portamento), CC67 (soft), CC121 (reset). Notes played on the external keyboard are always heard regardless of the "CC target" setting — that setting only decides where incoming control changes and pitch bend go (the MIDI file's channel, or a separate virtual "live" channel).
MIDI Out
Sends every channel event of a currently playing file to a USB-connected sound module or synthesizer (or a MIDI interface hooked up to a computer). "Meta" events aren't transmitted.
To enable it:
- Tick "Enable USB Midi" and "Show MIDI OUT button" in Settings > USB.
- On the main screen, turn on MIDI Out mode with the "Midi 5 pin" button (just before the Play button); tapping it again returns to normal playback.
Current limitations
- Manual program changes and track volumes aren't honored.
- Incompatible with "Exit — Keep playing" (background playback).
- Not usable for extremely dense MIDI files ("black MIDI").
- Short SysEx events are sent, but long/complete SysEx messages may not transmit correctly.
On some devices, sound stops coming out of the internal speakers once a USB MIDI/audio interface is connected (it stays available over headphones): unplug the USB cable or turn off MIDI Out mode via the "Midi 5 pin" button to get the internal output back. This feature is CPU-hungry, especially with "perspective" visualization modes — consider hiding the piano keys, lowering the visualization refresh rate (USB settings), or switching to the static "file list" display during MIDI Out playback if needed. Since this is a Pro feature, test it works with your gear on the free version first before buying Pro: in the free version, notes (except drums) are altered right before sending, while other channel events go through unchanged.
Large files: streaming playback mode
Normally a MIDI file is fully loaded into memory and rendered for visualization before playback can start. For very large files (100,000 to several million notes), that can take over a minute. A special visualization algorithm can instead start playback just a few seconds after loading — turned on automatically past a configurable size threshold (visualization settings screen, "Streaming mode").
- This mode needs some free memory headroom — performance depends on the device and Android version (Android 4.1 "Jelly Bean" and later handles reserved memory better).
- Lyrics/text availability can be limited in this mode.
Tip: turn on "linear velocity translucency" (visualization settings) to make patterns easier to tell apart. Leave "Keep all notes in memory" on unless you specifically need to save RAM (the saving is only really noticeable if playback starts very early — otherwise too much of the visuals are already generated anyway).